Welcome to my little corner of the internet, where I've gathered all the nifty IT stuff that I find super interesting and useful. You will see my System Administrator notes, tips, and tools that I use based on my experience. These resources help me tackle tech issues with ease and boost my productivity. I truly hope you find these materials as valuable as I do. And hey, thanks for dropping by my little IT sanctuary. Alexander Reydman
Monday, November 7, 2022
Tuesday, November 1, 2022
Implementing Multi-Factor Authentication (MFA)
Implementing Multi-Factor Authentication (MFA) adds an additional layer of security to your systems by requiring users to provide multiple forms of identification before gaining access. Here's a general guide on how to implement MFA:
1. Choose MFA Method:
- Decide on the MFA methods you want to implement. Common methods include:
- Text Message (SMS): Users receive a code via SMS.
- Email: Users receive a code via email.
- Authentication Apps: Users use an app like Google Authenticator or Authy to generate time-sensitive codes.
- Hardware Tokens: Physical devices that generate codes.
2. Select Appropriate Systems:
- Determine which systems or applications will require MFA. This can include login portals, email accounts, VPN access, or any other sensitive systems.
3. Integrate MFA into Identity Providers:
- If you're using an identity provider (IDP) or authentication service, ensure that it supports MFA. Many modern identity solutions have built-in MFA capabilities.
4. Configure MFA for Users:
- For each user, enable MFA and associate the chosen authentication method(s) with their account. This is often done through user account settings.
5. Communicate Changes to Users:
- Inform users about the upcoming MFA implementation. Clearly communicate the new authentication process, the methods they can use, and any steps they need to take.
6. Enforce MFA:
- Once configured, enforce MFA for the selected systems. Users will now need to provide additional verification, such as a code from their authentication app or a text message, in addition to their regular username and password.
7. Test the MFA Implementation:
- Conduct thorough testing to ensure that MFA is functioning as expected. Verify that users can successfully authenticate using the chosen methods.
8. Provide Backup Options:
- Account for scenarios where users may not have access to their primary MFA method. Provide backup options, such as backup codes or alternative authentication methods.
9. Monitor and Update:
- Regularly monitor MFA usage and be prepared to update the MFA methods over time. Consider evolving technologies and potential security vulnerabilities.
10. Educate Users:
- Educate users on the importance of MFA, how it enhances security, and best practices for using MFA effectively. Provide resources and support for any questions or concerns.
11. Compliance and Regulations:
- Ensure that the MFA implementation aligns with industry regulations and compliance standards applicable to your organization.
12. Continuous Improvement:
- Periodically review and improve your MFA implementation based on user feedback, changes in technology, and evolving security threats.
By implementing Multi-Factor Authentication, you significantly enhance the security posture of your systems, protecting against unauthorized access even if passwords are compromised. It's a crucial component of a comprehensive cybersecurity strategy
Thursday, October 20, 2022
TV Online
Wednesday, October 19, 2022
Golder rule for Sys Admins - 3
A quick reminder about one of life's golden rules: treat others as you would want to be treated. Yup, it's the oldie but goodie, the classic, the timeless piece of advice that never goes out of style.
Saturday, October 8, 2022
Golder rule for sys admins -2
Golden rule for sys admins: always stick to using tested software instead of new ones. New software can be a bit tricky and may require more time and attention. So, before you go ahead and implement any new software in our organization, make sure to test it on yourself first.
Tuesday, September 20, 2022
Setting Outlook Group Policies
Setting Outlook Group Policies
 When you are in an Active Directory network environment, you can set Outlook policies to enforce settings on a specific or a group of users or computers.
This is mainly to be used to change or limit the default behavior of Outlook in a corporate environment but can also be useful in some home environments. For instance, as a home user you might want to set policies on what your children can and cannot do in Outlook.
This article explains how you can set Group Policies for Outlook and which tools are needed for it.
- Download and install the Office Policy Templates
- Setting Policies in an Active Directory network environment
- Setting Policies on the local computer
Download and install the Office Policy Templates
 The Group Policy Administrative Templates and documentation files are specific for each Office version. Use the links below to download the correct template files for your Outlook version.
- Office 2010 Policy Templates
- Office 2013 Policy Templates
- Office 2016, Office 2019, Office 2021 (LTSC) and Microsoft 365 Apps for Enterprise Policy Templates
Installing the Office Policy Templates
 After downloading the Office policy templates, you must install them before you can use them. While there are separate packages for the 32-bit and 64-bit AdminTemplates, this only applies to the Office Customization Tools (OCT) and not the policy templates themselves. The adm and admx templates in both packages are exactly the same.
- Run the installer and accept the License Agreement.
- Select a location to extract the file to. For example:
C:\OfficePolicies - Open the folder in Explorer, select all the ADMX-files from the ADMX folder and the ADML-files from the en-us folder (or your localized language when available) and copy them to;
C:\Windows\PolicyDefinitions- If you want to control a Active Directory network environment, then you can also copy them to the
Sysvol\Domain\Policies\PolicyDefinitionsfolder on a domain controller.
- If you want to control a Active Directory network environment, then you can also copy them to the
- If you get prompted whether you want to overwrite the files, choose “Yes to All”.
If you get prompted by User Account Control (UAC), press Continue or provide Administrator level credentials.
Setting Policies in an Active Directory network environment
 This method describes how you can set Group Policies for clients in a corporate Active Directory environment. Aside from installing the policy templates for your Office version(s), you’ll need the Remote Server Administration Tools (RSAT) to edit and set the policies.
Download: RSAT for Windows 7 (32-bit and 64-bit)
Download: RSAT for Windows 8 (32-bit and 64-bit)
Download: RSAT for Windows 8.1 (32-bit and 64-bit)
Download: RSAT for Windows 10 (32-bit and 64-bit) (Version 1803 and earlier)
Install RSAT for Windows 11 and Windows 10 (Version 1809 and later)
Windows 11 and Windows 10, Version 1809 and later, have the RSAT built-in as “Optional features”. You can install the Group Policy Management Tools Console (GPMC) in the following way;
- Windows 10
Start-> Settings-> Apps-> Optional features-> Add a feature-> select: RSAT: Group Policy Management Tools - Windows 11
Start-> Settings-> Apps-> Optional features-> View features-> select: RSAT: Group Policy Management Tools
Group Policy Management Console (GPMC)
- The GPMC can be opened in several ways. Some are;
- Start-> type (to search); Group Policy Management
- Start-> type (to search); gpmc.msc
- Start-> and from the All apps list choose; Windows Administrative Tools-> Group Policy Management
- Control panel-> Administrative Tools-> Group Policy Management.
- Run-> type; gpmc.msc
- Run-> type; mmc-> File-> Add/Remove Snap-in-> Group Policy Management
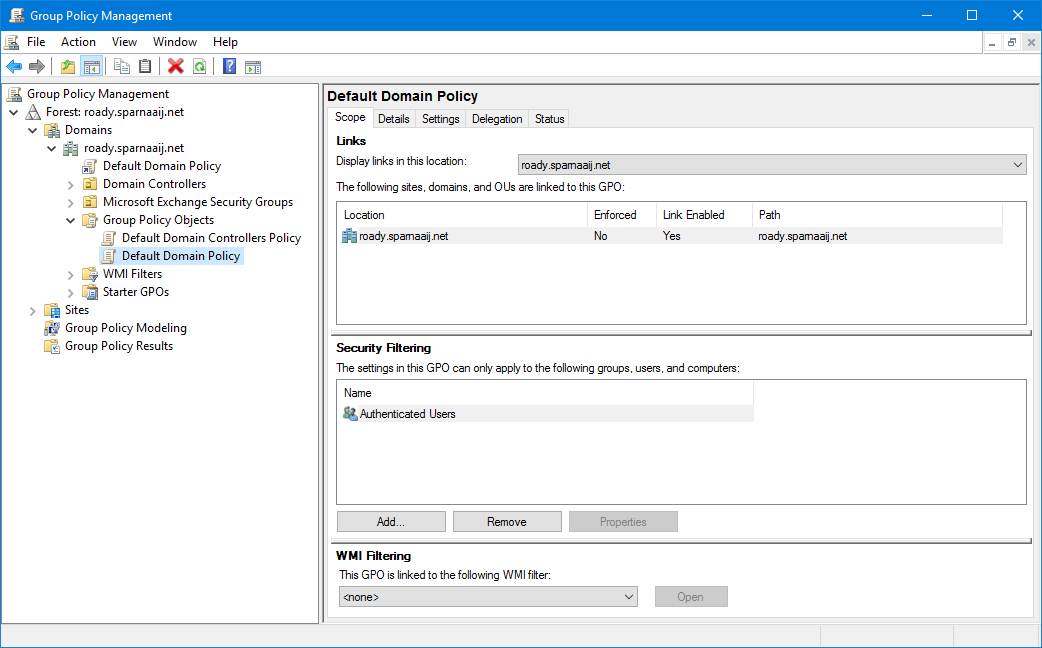
In the left column, browse to the folder Group Policy Objects and select the Policy you wish to enforce Outlook policies on.

The Group Policy Management Console with the Default Domain Policy GPO selected.- Right click the Policy and choose Edit…
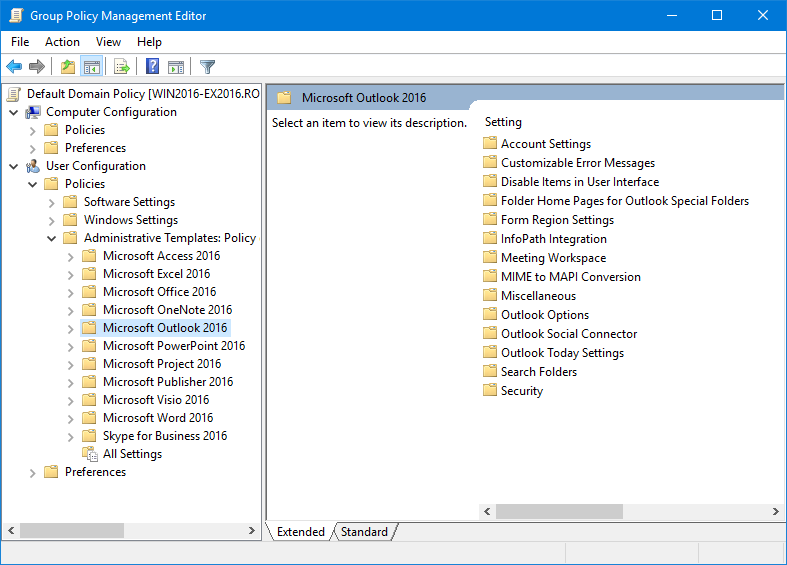
- The policy templates which you installed for Outlook will be loaded automatically under;
User Configuration-> Policies-> Microsoft Office Outlook version. You now will see Outlook listed and you can now enforce settings.

The Outlook 2016 policy template loaded in the Group Policy Management Editor.
Setting Policies on the local computer
 Once you’ve installed the Group Policy Administrative Templates of your Office version, you can also control the Office policies on your own computer via the Group Policy Editor.
Your computer can but doesn’t need to be part of a domain for this.
Note:
The Group Policy Editor is not available when you are using a “Home” version of Windows.
- You can open the Group Policy Editor in the following way;
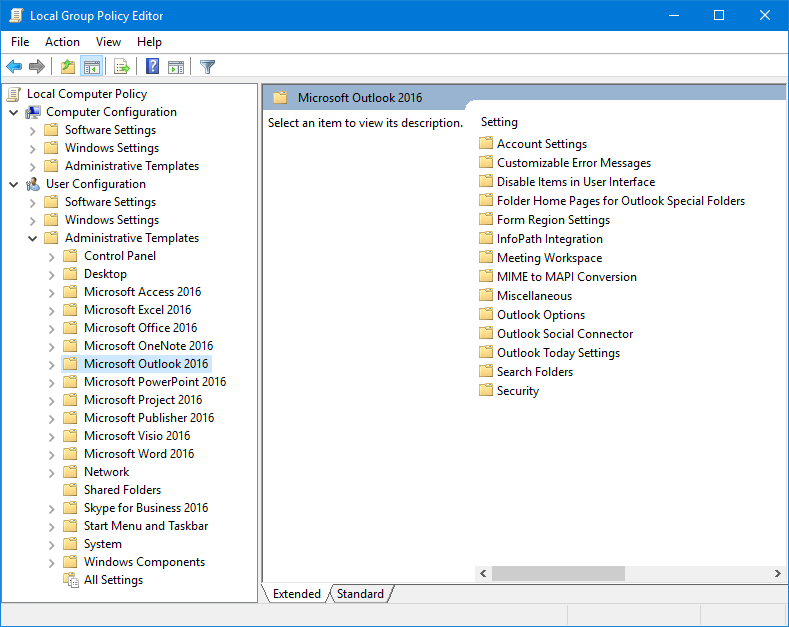
Start-> type;gpedit.msc - The policy templates which you installed for Outlook will be loaded automatically under;
User Configuration-> Administrative Templates-> Microsoft Office Outlook version. You now will see Outlook listed and you can now enforce settings. Some of the settings will only take effect after you restart your computer.

The Outlook 2016 policy template loaded in the local Group Policy Editor.Source: https://www.howto-outlook.com/howto/policies.htm
Thursday, September 15, 2022
Reset network configuration
This commands I use almost every second day
Resetting the network stack in command line
- Type ipconfig /release and press Enter.
- Type ipconfig /flushdns and press Enter.
- Type ipconfig /renew and press Enter. (This will stall for a moment.)
- Type netsh int ip reset and press Enter. (Don't restart yet.)
- Type netsh winsock reset and press Enter.
- Go to Start – Settings, which are hidden behind the gear icon (or press the Win + I key).
- Select “Network and Internet”, then “Status”.
- At the bottom of the network status page, click on “Reset Network”.
- Click on “Reset Now”.
- Open your phone's settings app by tapping the Settings shortcut on your home screen.
- Scroll down and select System.
- Select Reset options at the bottom.
- Choose Reset Wi-Fi, mobile & Bluetooth.
- Start the reset process by tapping Reset settings..
Ninite.com - download commonly installed programs all at once when setting up a new computer.
Ninite.com is a free and user-friendly service that simplifies the process of installing and updating commonly used software on Windows com...
-
Ninite.com is a free and user-friendly service that simplifies the process of installing and updating commonly used software on Windows com...
-
Microsoft recently released an update for Windows 11 build 26052, addressing several critical issues that users have encountered since its ...
-
Investigating information security incidents is not as hot a topic as pentesting, but this scientific and practical discipline continues to ...


